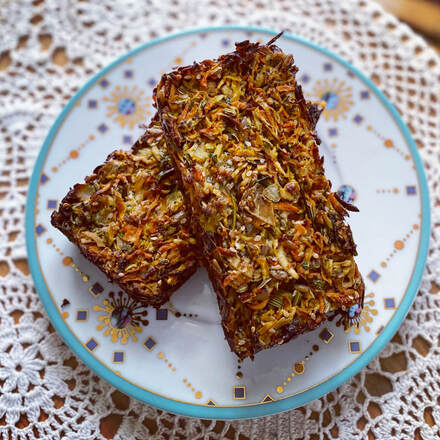
|
rabbit food, served with European butter |
Like I always say: It's about moderation. You should enjoy the foods you love, just be mindful of how much you're eating |
I'm a dietitian and diabetic educator, but that doesn't mean I don't like OR don't eat the good stuff. European style butter is made from cultured cream and slight fermentation. This results in a unique flavor with a higher fat content than what you find from most American dairy farmers. There are many to choose from including, Kerrygold, Plugra, President, and Beurre de Baratte. You can order them online or find them at specialty grocers. The object of my desire from these is the Beurre de Baratte. It's made by a young cheese master, Rodolphe Le Meunier, a genuineMeilleur Ouvrier de France making butter the old-fashioned from churning. Everyone raves about this French Normandy butter because of it's unique nutty, umami flavor. It's even wrapped in a gold foil to give you that extra posh at a fancy dinner party. Better yet, it makes an excellent gift to that ultimate foodie friend of yours.
for the love of crumpets
I woke up early this past Saturday morning craving crumpets. Crumpets, the Anglo-Saxon-invented griddle cake made of flour and yeast, are incredibly easy to make. As long as you have patience, anyone can prepare these "curled-up cakes".
A large French pressed coffee and book kept me busy as I waited for the batter to rest. I didn't have the standard shallow rings every recipe requires, so I used my cookie cutters and went crazy with MN state, skull, circle, and various other shapes. Not exactly ideal, but easy enough to handle, and, as it turns out, a lot more fun. In a pinch, one can also use thoroughly cleaned and rinsed tuna cans.
The best part about making these chewy, English-style cakes, is that when left slightly undercooked, they reheat nicely... like in my trumpet crumpet recipe (see below).
Side note: if you want my crumpet recipe, you'll have to subscribe to my newsletter and read about it this week (wink, wink). Otherwise, stick to the store-bought for now.
the king of mushrooms
King trumpet mushrooms, the largest of the oyster mushroom species, are one of many varieties of mushrooms that can be used in this recipe. It was certainly the key mushroom highlighted in this dish. I like to mix many varieties together, as each mushroom has a different texture and flavor that offers your taste buds something unique every time. Try a few different kinds for yourself.
-more on trumpet and other species of mushrooms in the this weeks newsletter as well-
trumpet crumpet recipe
Prepares: 2
Ingredients
2 crumpets, fresh* cut in half
8 oz mushrooms chopped (any will do: King trumpet, button, crimini, shaitake, mix and match)
3 cloves garlic, minced
1/8 tsp truffle salt (or Kosher)
1/4 onion, half-moon shaped
2 oz gruyere, grated
1 tablespoon butter
side of greens: pictured here is arugula and pear in a fennel vinaigrette
*substitute store bought English muffins if crumpets are not in the cards
Directions:
1. Caramelize onions by heating a large sauté pan with butter on medium-high heat. Add the sliced onions into the pan and cook until translucent, 1-2 minutes.
2. Reduce heat to medium low and stir every few minutes. If the onions start to stick too much and brown around the edges, reduce your heat. Continue to stir for 30-40 minutes, depending on how soft you prefer your onions to be. If the pot starts to burn, add a bit of liquid (water will do).
Just before the onions finish cooking, about 5-8 minutes, toss in the mushrooms with truffle salt and garlic. Preheat oven to a broil
3. Allow to cook until mushrooms are tender. At this time, arrange crumpets on a baking sheet. Place onion/mushroom mix on top, then with cheese. Put in the oven and toast until browned, about 2-3 minutes.
4. Meanwhile, prepare your eggs: sunny side up, poached, fried... the choice is yours
5. Arrange the crumpets on a plate, place an egg on top, and serve with side salad.
There you have it, a complete meal: great source of protein from the eggs, vitamins/minerals from the veggies, and fiber from the whole-grains
know the difference
Yes, there are differences between soy sauce and tamari: While both are derived from soy through fermentation, they surprisingly have different taste profiles largely due to the presence of wheat. Soy sauce always contains wheat (beware, you gluten-free folks) and tamari has little-to-no wheat. Yes, you may actually find brands of tamari out there that do contain wheat (ahem, gluten), but the label will indicate if it is gluten-free or wheat-free.
The next key distinction is the country of origin.
Soy Sauce: A Chinese byproduct of soy products now made throughout Asia
Tamari: A Japanese byproduct of miso paste, typically less salty (read your labels), and thicker
The next key distinction is the country of origin.
Soy Sauce: A Chinese byproduct of soy products now made throughout Asia
Tamari: A Japanese byproduct of miso paste, typically less salty (read your labels), and thicker
production of soy sauce vs. tamari
Soy sauce is made through fermentation or by hydrolysis (chemically engineered), with different methods and durations of fermentation and water, salt content, soy, and other non-specific added ingredients. Therefore, there are remarkable differences in flavor between soy sauce brands. You'll have to test them all, or whatever you can find, and choose the one that makes your personal taste buds scream for more.
Traditionally speaking, soy sauces take months to make. For simplicity's sake, the sauce is made by mixing roasted/cracked grains with cooked soy beans, mold cultures, and yeasts in brine. Here are the steps in case you want more deets:
- Soak and cook: soy beans in water, separate from wheat, which is roasted and crushed
- Koji culturing: 50/50 grain to soy ratio mixed with spores
- Brewing: proceed to mix in salt brine and ferment until mold develops (length of mold time varies)
- Pressing: separate solid from liquid
- Pasteurization: raw soy sauce is treated
- Storage: aged until desired taste is achieved
tamari, the "original" Japanese soy sauce
Tamari, on the other hand, is the liquid run-off from miso paste, fermented soybeans with salt, and koji [a more specific fungus, Aspergillus oryzae], rice barley, or other ingredients. Typically, the ratio of wheat and other grains to soy is much smaller than soy sauce, and often contains NO wheat. Homemade tamari can provide people with celiac disease, wheat sensitivities or an intolerance with an tasty alternative to soy sauce. Be sure to read the label on commercial tamari to be sure it specifically says "gluten-free".
Now, the steps of producing tamari:
- Soak and cook: soy beans in water, separate from wheat (sometimes used) along with other grains (barley, rice, buckwheat, rye hemp seed), which is roasted and crushed
- Koji culturing: grain blend mixed with Aspergillus oryzae
- Brewing: fermentation time ranges from 5 days to several years
- Extraction: liquid is extracted from the paste (aka miso)
- Pasteurization: raw tamari is treated
- Storage: aged until desired taste is achieved
battle of the sauces
Time to experiment! Divide this recipe by 2, then make the recipe using soy sauce and make the recipe again using tamari. Compare each recipe after your taste test with friends, family, or just yourself. Do you notice anything different between the two? Which has more depth? Is one noticeably saltier than the other? Leave your comments below to share your opinion.
Asian Grain Bowl (vegan)
Serves 2
Ingredients:
8 oz tofu, cubed
1 tablespoon sesame oil
1 tablespoon rice wine vinegar
5 tablespoons tamari or soy sauce
1” piece grated ginger
1 cup short grain brown rice, rinsed and drained
8 baby bok choy, sliced in half
1/2 cup lotus, bite sized pieces
1/2 cup assorted vegetables (carrot and red cabbage shown)
1 cup assorted pickled vegetables*(optional)
Directions:
1. In a pot, add 1 ¾ cup water with rice and 1 tablespoon tamari. Bring to a boil, reduce to a simmer and cook, about 40 minutes.
2. Meanwhile, in a mixing bowl, toss the tofu and lotus in the following marinade ingredients: sesame, rice wine vinegar, and grated ginger. Allow to sit until you begin assembling the bowls.
3. Ten minutes before the rice is finished, assemble your steamer and begin heating the water, about ½ “ high in the pan holding the steamer. When ready to steam, place bok choy in steamer and cook for 3-5 minutes.
4. Assemble each bowl, dividing each of the ingredients equally: rice, bok choy, tofu, lotus, carrot, red cabbage, pickled vegetables, and drizzle some of the leftover tofu marinade on top (green onions and sesame seeds make for great garnishes if you want to be showy).
You can choose any kind of pickled vegetables, including: carrot, asparagus, beets, green beans, watermelon, cucumbers (quick pickles), or radish variety.
suggestions
I recommend keeping both sauces stocked in your kitchen to experiment in your recipes. Swapping out one for another will certainly change the flavour, but it won't affect the overall dish in terms of 'turning out'.
Looking for more recipes to experiment with using soy sauce/tamari? No worries, I've got you covered:
peanut sauce
lotus root, carrot, & daikon slaw
-or- make your own fried rice: toss soy sauce/tamari in leftover rice sautéed with scrambled egg and veggies (bok choy, mushrooms, carrot, onion).
Looking for more recipes to experiment with using soy sauce/tamari? No worries, I've got you covered:
peanut sauce
lotus root, carrot, & daikon slaw
-or- make your own fried rice: toss soy sauce/tamari in leftover rice sautéed with scrambled egg and veggies (bok choy, mushrooms, carrot, onion).
Ch ch ch ch ch ch CHILI
I love chili. It's incredibly diverse, you can add just about any meat, bean or vegetable, make it spicy (or not...but where's the fun in that?), and it has lots of health benefits.
why I eat chili and why YOU should too!
- Clears the sinuses -say goodbye congestion
- Iron -from beans and greens to prevent anemia
- Fiber -bean lovers, this will help keep you fuller longer, keep you regular, and your heart happy
- Nutritional balance of macros (CHO, Fat, protein) -chili is a well-balanced meal with vegetables and macronutrients
- Vitamin A + C overload -if the chili you're eating has peppers, chilies, and orange produce, it will boost your immune system
- Capsicum love -will only benefit if there are hot chilies present- it doesn't hurt to work up a sweat
Historically,
Texas was the first to 'discover' and take credit for chili, but undeniably it has Mexican roots. You may know this traditionally as chili con carne, which includes beef, pork, chiles, garlic, onion, oregano and cumin. New Mexican chile verde also leaves out the beans. Thick, juicy chunks of pork shoulder is the backbone of this chili with a tart tomatillo sauce. However, you will find that many chili's do incorporate beans and often many varieties of beans like pinto, black, garbanzo, and kidney.
In the 1880's, San Antonio was the first to have chili stands where women, a.k.a 'chili queens', sold bowls o'red for a mere 10 cents, including bread and water as accompaniments. The dish was a hit and eventually made it's way north to Chicago at the World Fair in 1893. Some would even say this dish was responsible for keeping many alive during the Great Depression due to the low cost and free crackers. The times have certainly changed since then, but it still remains true to be a low cost dish for many.
No longer are chili joints and competitions found only in Texas. In fact, we have many competitions fast approaching right here in Minnesota where you can either taste or participate or both.
Chili Cook-off's in 2018 around the state
January 17th: Crosslake Chamber Chili Cook-off, Baxter, MN
January 27th: Owatonna's Chili Cook-off, Owatonna, MN
February 9th & 10th: Chilly Open, Wayzata, MN
February 22nd is National Chili Day
And if you're the adventurous type, check out this website from the World Championship Chili Cook-off to find competitions nationally.
three sister's chili
Throughout the year, I eat and prepare chili. It changes seasonally at my home and varies drastically based on what's in my pantry/fridge. This week, I thought I would continue on the cinnamon trend I started (from the monthly newsletter) and pull ingredients that were around and available. I always have beans on hand, and that with the combination of corn and squash make this the 'three sister's' chili.
-Three sisters, culinarily speaking, are the three main agricultural crops of many Native Americans in North American. They include winter squash, corn, and beans, and are all grown together as companions. Each crop is planted close so that each may benefit from one another.
corn is for structure
beans are for nitrogen fixing
squash is for weed prevention
beans are for nitrogen fixing
squash is for weed prevention
ok, ok, here's the recipe
Prepares 24 cups
Ingredients:
2 lbs butternut squash, cubed
7 cloves garlic, roasted and pureed*
3 tablespoons oil
3 - 32oz jars (96oz total) tomatoes, diced and pureed
3 hot pickled Hungarian peppers, pureed*
2 medium onions, diced
1 lb carrots, sliced into rounds (~9 medium)
5 cups cooked black beans
2 cups corn
1 1/2 tablespoon salt, more to taste
1 tablespoon pepper, more to taste
2 tablespoons coriander, freshly ground
1 tablespoon cinnamon
3 tablespoons cumin
1/2 cup Greek yogurt
1/2 cup cilantro to garnish, chopped
*option to puree or chop
Directions:
1. In a 425F oven, roast butternut with 2 tablespoons oil and cook for 30 minutes or until tender.
2. Meanwhile, heat remaining oil and sauté onion and carrot. After ~6-8 minutes when carrot begins to soften, add remaining ingredients and stir until combined.
3. Add butternut and simmer on stove until it's reached your desired consistency. The longer you let it simmer, the more flavor will develop. Let it stew and grow if you want something magical in your mouth without regret. Garnish with Greek yogurt and cilantro.
Having extra chili on hand is never a bad thing. You can always freeze it and enjoy it weeks or months later when you're lazy. Or give to your guests: they'll love you forever.
It was a dal kinda day
After eating the truly spicy and delicious curry at White Horse, a downtown St. Cloud restaurant, I felt the overwhelming urge to make Indian food on my own. Plus, as Minnesota descends into the winter months, there's a biting chill in the air that can really only be remedied by hot, savory, spicy food.
Indian seemed like a swell idea.
When I think of Indian food, I think of chutney, sambar, curry and spices like cardamom, cinnamon, turmeric, and cumin. I think of rice, lentils, coconut, mustard seed, biryani, lamb, samosas, roti and other flatbreads.
Oh, yes, & perhaps my very favorite, dal.
Many foods come to mind when I think of Indian cuisine; it's an enormous country with a broad range of diverse soils, climates, and cultures. It makes sense that many flavors, dishes, and cooking methods have come to represent this ever-changing, always-dynamic subcontinent.
Dal (also spelled daal, dail, dhal)
It's one of those foods with two meanings:
1. dried, split pulses (i.e. lentils, peas, and beans)
2. soups prepared from these pulses
But no matter what, pulses are the star. You can assume that when you read/hear the work dal that pulses are the key ingredient, though may not necessarily be in soup form.
Traditionally, dals are eaten with rice or flatbread like chapati, roti, or naan. They're high in fiber (from the lentils, beans, peas), and are a fantastic and affordable source of healthy plant-based protein, as well as being high in B vitamins, thiamine and folic acid, and minerals, iron and zinc.
In this particular recipe, I chose to substitute acorn squash for rice (starch for starch) and use cauliflower as the star vegetable. The cauliflower florets make a lovely addition to this dish with a slightly crisp texture from the oven that balances the sweetness from the squash. Since I didn't use rice, but rather squash, I was able to avoid adding coconut milk to ensure a natural sweet flavor without the added fat.
Dal-i-flower recipe
Serves: 4
Ingredients
1 cup split yellow lentils
2 tablespoons mustard oil (or vegetable oil)
3 chilis, kept whole
¼ tsp cardamom
1 tsp cumin
¼ tsp mustard seed
1 yellow onion, small dice
3 cups squash, raw, cut into 1” cubes (I chose acorn)
1 tsp. Kosher salt
3 cups water or broth
½ cup raw, unsweetened coconut
4 cups cauliflower
1 tsp turmeric
1 tablespoon oil
1 cup yogurt
8 sprigs cilantro
Directions
- Clean and rinse lentils thoroughly.
- In a large pot heat mustard oil, add chilis, cardamom, cumin, mustard seed, and onion. After 3 minutes, add the lentils and squash, kosher salt, broth, and coconut. Bring to a boil and reduce to a simmer and cook for about 45 minutes.
- Ten minutes before the lentils cook, heat oven to a broil. Toss cauliflower in turmeric and oil, then put on a baking sheet. Broil for 3-5 minutes until browned, but not burnt.
- Assemble: In a bowl, place lentil mixture on bottom with cauliflower on top. Garnish with dollop of yogurt and a couple sprigs of cilantro.
balancing breakfast
Whether breakfast, lunch, or dinner, all meals should be nutritionally balanced. But, understandably so, it can be difficult to consume veggies at the first meal of the day... if you eat a typical American breakfast. Many cultures do not consume the American standard of bacon, eggs, or cereal grains for breaky. Instead, others eat foods like:
- beans, eggs, cheese, jam, and pickles (Egypt)
- Chutney, dips, roti or other breads (India)
- Watery noodle soup with veggies and meat (Madagascar)
- Miso soup, rice, pickled vegetables and a protein like fish or Japanese omelette (Japan)
- Open-faced sandwich with fish or cold cuts, cheese, mayo and fresh veggies like tomato and cucumber (Sweden)
- Plate of ham, cheese, bread, Feijoada (Brazil)
answer:
You probably could have guessed it, produce, and lots of it! Making sure you get at least 3-4 servings of fruit (1 serving=1 small apple, size of a tennis ball) and another 4-5 servings of vegetables (1 serving=1/2 cup cooked or 1 cup raw) every day is incredibly important. And it's a lot easier than you think, even for breakfast. Here are some suggestions on how to improve your fruit and veggie consumption:
|
|
recipe: balanced cornmeal pancakes
Pancakes are meant to be simple, quick and easy. With this recipe, one can enjoy it for breakfast or dinner, especially since cornmeal has great versatility.
Serves: 4
Ingredients:
3/4 cup cornmeal
1 cup all purpose flour
1 tablespoon baking powder
2 tablespoons thyme, chopped
½ teaspoon salt
1 egg, beaten
1 1/2 cup milk
¼ cup honey or sweetener of your choice (agave, molasses, maple syrup)
2 tablespoons butter for greasing the pan
1 cup Greek yogurt
2 cups blueberries
4 cups arugula (or kale, as seen in the pic)
Directions
1. Combine all dry ingredients, which include the cornmeal, flours, baking powder, thyme, and salt into one medium sized bowl and mix well with a fork.
2. In a second bowl, whisk the egg and milk together and slowly drizzle in 2 tablespoons honey or sweetener.
3. Gradually incorporate the wet ingredients to the dry ingredients while mixing with a fork. Be sure to mix until the batter begins to come together; you do not want to work out all the clumps. If you sifted the flour before adding, you may need to add more liquid until thick, but loose batter results.
4. Heat the griddle to 350° F or a frying pan. Add the butter once it is hot, a little bit at a time, and in batches, ladle the batter onto the pan. Bubbles will appear around the edges to indicate a golden brown crust. Flip and cook for another 2 minutes or until the pancake has set. Remove from pan and keep warm or eat immediately.
5. Top pancakes with a dollop of Greek yogurt, blueberries, honey drizzle, and spicy arugula greens.
Last week I was asked to prepare and instruct a cooking class/demo for a group of people just outside of Chicago. They wanted similar flavour profiles to their traditional Mexican fare, but also something new and exciting that wasn't intimidating. Other important aspects of this class were to include low sodium foods, lower fat foods (not to be confused with low fat -simply less animal and more plant based fats), and heavier on fresh produce to demonstrate healthy eating.
The objective was to engage the family in the kitchen and learn a new technique, food item, and/or nutrition information. Considering these requests, my mind immediately went to watermelon, ceviche and grilling. The rest of the menu unfolded itself once I couldn't shake the idea of these foods and cooking methods.
Menu:
- mixed melon salad: massaged kale, pepita oil, melon, queso
- shrimp ceviche: avocado, cuke, red onion, cilantro, lime, tomatillo
- grilled chicken anticucho: pascilla pepper and roasted garlic marinade with pickled red onion
- corn, jicama & brown rice: charred corn, tomato, green onion
- fresh fruit platter with yogurt dip: mint, lime
chicken anticucho
Serves 4
Ingredients
20 oz chicken, bone-in
3 cups anticuchera sauce*
Direction:
1. marinate chicken in anticuchera sauce for a minimum of 3 hours
2. remove chicken from sauce and grill for 40-50 minutes, basting as necessary
3. heat sauce and serve
Ingredients
20 oz chicken, bone-in
3 cups anticuchera sauce*
Direction:
1. marinate chicken in anticuchera sauce for a minimum of 3 hours
2. remove chicken from sauce and grill for 40-50 minutes, basting as necessary
3. heat sauce and serve
anticuchera sauce*
Prepares 3 cups
1 cup pasilla pepper paste (~6 each)
1/3 cup garlic paste
2 tsp. black peppercorn, ground
1/2 tbsp. cumin, toasted and ground
1/2 tbsp. oregano
3/4 cup red wine vinegar
3/4 cup vegetable oil
salt to taste
Direction:
1. If making chili paste from scratch, begin here by throughly washing peppers. Cut in half and remove seeds and veins. Put chiles in a bowl, cover with water and let soak for 12 hours or overnight, changing water if time/schedule permits during soaking. Once soaked, drain chiles and put in a blender with 1/4 cup boiling water. Blend for 5 min -chili paste
2. If you are not making your own chili paste, start here. Place all ingredients in a bowl and mix thoroughly. Set aside for 3 hours or overnight to marinade.
Pasilla peppers are not the original pepper to this sauce, but to make it Mexican, I swapped out the Peruvian pepper for a mild, low heat pepper, pasilla. The word anticuchos means meat stew, originating in the Andes and is now a popular menu in Peru, Bolivia, Argentina and Chlie, which consists of meats cooked in a highly acidic, vinegar marinade often including dried peppers. Additionally, it is usually served on a skewer with a boiled potato or bread. Feel free to try the skewers vs my method; it's quicker if you're short on time and don't have 40-50 minutes to grill.
Still hungry? Check out other great eats like grilled radish or lotus root, carrot & daikon slaw.
After a long day of work, I was finally able to relax. And make LASAGNA! It's one of my favorite dishes to prepare....and eat. Who doesn't love the complexity of a something so saucy and delicious?
Do not get frightened by this post; it comes across as intimidating, but need not be. In fact, you could make just one component of the lasagna. Carrot top pesto or tomato sauce is extremely versatile. Put it on noodles, quinoa, raw veggies like radish...the possibilities are endless, really. The noodles can also be made into a different shapes like spaghetti or even ravioli.
Now, to being:
Squash Noodles:
prepares 1 lb pasta, fresh
3 cups flour
2 pinches of salt, kosher
2 eggs
1/2 cup roasted carnival squash
1 Tablespoon water
2 tablespoons olive oil
Preparation:
When preparing the pasta, keep in mind it's no different than a simple pasta recipe but without the squash. The only additional steps are to roast and puree the squash (allow to cool before use). Make a well with the sifted flour and salt. Crack both eggs into the well, as well as the squash and water. With a fork, slowly incorporate the flour into the egg mixture. As it begins to form a ball, add the oil. Knead for 8-10 minutes and adjust accordingly with flour and water. Allow to rest and cover for at least 30 minutes at room temperature.
With your pasta roller, roll out 3 sheets (the size of the pan) for the bottom layer to number 4. The remaining lasagna noodles are best rolled to number 5. Dry and boil for about three minutes. If you don't have a drying rack, improvise. See the pictures below for inspiration. Cool and lay flat (gently brush oil to cooked noodles to prevent tearing).
To make it more fun, sip on a beautiful Pinot Noir and take your time. This isn't a race. Enjoy yourself, and your food.
Carrot Top Pesto:
Prepares about 5 cups depending on desired consistency
1/2 cup toasted, pepitas
3/4 cup dried pie pumpkin seeds
3/4 cup toasted sprouted walnuts
2 cups packed carrot tops (stems removed)
6 cups fresh spinach
1 cup fresh basil
3 ounces of grated Pecorino Romano cheese
8 roasted garlic cloves
1/2 cup grapeseed oil
1/2 cup olive oil
1/2 cup water
Salt and Pepper to taste
Preparation: Toast all nuts/seeds and blend in processor. Add garlic and pulse, careful not to pulse too much. Proceed and add spinach, basil and carrot tops in batches. Then add cheese. Very slowly pour the oils into the mixture as you process. Add the water the same way, streaming it into the vibrant green blend. Add salt and pepper to taste.
Words of advice:
- You don't want a smooth pureed sauce, but rather with a rough texture, so don't over process. Pulse the ingredients instead of allowing the machine to run continuously.
- One may substitute the pie pumpkin seeds with more pepitas if you don't have them on hand. I reserved the pumpkin seeds when I was roasting the meat of the pumpkin and let then dry out at room temperature for about 5-7 days. Then I toasted them in the oven for 5 minutes at 350F.
Basic Tomato Sauce:
Yields 3 1/2 quarts
1/4 cup olive oil
1 cup onion, diced
2 - 28 ounce cans of San Marzano tomatoes
4 ounces tomato paste
5 cloves garlice
1 pinch smoked Spanish paprika
1 bay leaf
1/4 cup dried basil
In a sauce pot, sweat onions in 1 tablespoon of olive oil. Add remaining ingredients and allow to simmer for 60 minutes. Remove the bay leaf and from heat. Puree with an immersion blender and adjust seasonings.
Lasagna:
Prepares one large 9x13" pan
1 eggplant, flame roasted on stove top then pureed (skins removed)
1/2 kabocha squash, cubed and roasted (350F for 45 minutes with 2 T. oil, salt and pepper)
16 ounces ricotta
2 ounces Pecorino Romano
3 cups shredded mozzarella
Pesto
Tomato Sauce
Heat oven to 375F
Oil the lasagna pan and layer the thicker (#4) lasagna noodles on the bottom. Spread the roasted eggplant on the noodles. Follow with cubed kabocha squash. Sprinkle shredded mozzarella cheese, add next layer of lasagna noodles. Spread pesto onto, followed by another layer of squash. Ladle tomato sauce, then top with noodles. Next comes more cheese, the ricotta. Then yet again, a layer of noodles. Put a thin layer of tomato sauce on top the noodles and sprinkle Asiago Romano to finish. Bake in oven for 50-60 minutes, until done.
Currently, I am in a place of transition, and am moving to Duluth, MN, leaving Chicago. A couple weeks ago, my father drove down from Sauk Rapids along with my mum and uncle. The move went great, but it left me kitchenless and reliant on friends. Truly I am thankful for their friendship and hospitality (Chris, Amy, Lynsey and Brian). As one last girls night with some of my closest Chicagoan friends, I asked to share one last meal. With the gloomy weather and chill in the air, I decided to express myself through a Brazilian fish stew (Moqueca Capixaba).
Six years ago, I moved to Chicago from a 3-month journey, primarily exploring Brazil. One of the worst snow storms hit the city as I arrived to the states, leaving me stranded. I knew I needed a new scene where I could grow professionally in both passions, food and nutrition, so I decided to stay. Soon I found a cheap apartment in Uptown, northern Chicago, and made it home. To bring this story full circle, I found it fitting to prepare a dish from my travels, which brought me to Chicago.
Moqueca Capixaba is a traditional fish stew from Bahia, Brazil with fish (cod, sea bass, shrimp), tomatoes, lime, peppers and coconut. Traditionally, it is cooked in a claypot, but was originally made in banana leaves many years ago. Slowly the stew evolved as the Spanish and Portuguese colonized Bahia, who later introduced the garlic, onions and cilantro.
Brazilian Fish Stew (Moqueca Capixaba)
Serves 6
Ingredients:
1.5 lbs fish (cod, sea bass, shrimp) - cleaned and cut into 1" cubes if using filets
32 oz. tomatoes crushed or 5 fresh tomatoes
3 tablespoons tomato paste
32 oz. coconut water
1 large onion, cut into thin half-moons
2 tablespoons coconut oil (olive oil is fine)
3 cloves garlic, minced
1 large red bell pepper, diced
1 large yellow bell pepper, diced
1 jalapeño pepper, seeded and minced
1 fresno pepper, seeded and minced
1 tsp. paprika
1/2 tsp. cayenne
2 limes, 1 juiced & 1 cut into wedges for garnish
salt and pepper to taste
1 cup cilantro, fresh for garnish
2 green onions sliced for garnish
Serve with cooked rice
I chose to cook my rice in coconut water with diced yellow onion. When the rice was cooked, I mixed in cilantro before serving.
Directions:
1. In a large, heated pot, sautéed your onion in coconut oil. Once translucent, add garlic, bell and hot peppers, and spices.
2. Add the coconut water, tomatoes, tomato paste, and juice of one lime to the pot. Mix well and stir occasionally for 5 minutes
3. Adjust the heat to a simmer and add the fish. Larger cuts of fish will take longer (cod, sea bass) and will need 20-30 minutes while smaller crustaceans (shrimp) only require 5-8 minutes depending on size.
4. Assemble the garnish plate and cook rice (optional) on the side.
Note: you may substitute the coconut water with coconut milk for a richer flavor, add different hot peppers or adjust the consistency. If you prefer a thinner stew, add less liquid/coconut water and if you prefer a thicker stew, adjust and add more.
Recipes are guidelines, and you're the cook! Make it your own and adjust as you desire
Still hungry? Check out carrot, parsnip cake to serve for dessert.
Wowza, I feel embarrassed about the lack of posts. My sincerest apologies, but I have much to show for my lack of appearance in the blogosphere. For instance, the completion of my Masters of Science in Clinical Nutrition! Fear not Salt & Pepper fans, I am back, and with many new, exciting topics to cover. If you have a suggestion, please feel free to comment below and I'll be sure to address.
This morning, I woke up thinking about grains. How I'd love to make an easy porridge utilizing a variety of whole grains packed with fiber and nutrition. I dug through the cupboards and found three varieties with different mouth feel and textures.
Grain #1: Good ol' Reliable Oats
Classic but a goodie; oats have a sweet flavor and almost never have their bran and germ removed during processing. I use regular oats in this recipe, but you ought to know there are quick and instant oats that exist as well. These are varieties that are steamed and flattened. But, if you like a nuttier, chewier texture, choose steel-cut oats. Steel-cut oats are the entire oat kernel and cook 20 minutes, unlike the others, which cook in less time.
Grain #2: Red Quinoa
You can find quinoa in some colors (purple, black, white & red) and taste mildly different from one another. I chose the red variety for this recipe being it has a crunchier bite and stark red color for a visual appeal. Most quinoa should be rinsed before cooking to remove saponins, which is used to ward off insects. An important unique quality about this grain, it's a complete protein that contains all essential amino acids (n=9). Typically, plant proteins are said to be incomplete, which is unlike this source.
Quinoa cooks in 10-12 minutes.
Grain #3: Farro
There are three species of farro, einkorn, emmer, and spelt (smallest to largest,
L-->R); all types of hulled wheat. Emmer considered higher quality for cooking than the other two grains. In this recipe, I chose emmer and cooked as follows:
1. bring large pot of salted water to a boil
2. add farro and cook until al dente (25-35 minutes)
3. pass through sieve
Homemade Porridge My Way
Serves 2
Ingredients:
1 cup oats, cooked
1/3 cup red quinoa, cooked
1/2 cup farro, cooked
1 cup blueberries
2 dollops Greek yogurt
2 tbsp honey
1 tbsp toasted pecans
1 tbsp hemp seeds
Instructions:
1. Combine all grains (oats, quinoa, farro) in a mixing bowl and salt to taste.
2. Layer a bowl with the following (in this order), grains, blueberries (other assorted fruits), yogurt, drizzled honey, topped with pecans and seeds.
3. Eat with spoon.
Honestly, this is super easy recipe that's full of fiber and tasty. Swap out the grains, fresh fruit and other varieties of nuts and you'll have a different porridge everyday.
Next up
Most Popular
Categories
All
Backpacking
Dough & Noodle
Main
Nosh
Sauce Or Spread
Skin
Soups & Stews
Spices
Sweets
Follow
Copyright © 2015 Ranelle Kirchner - All Rights Reserved - Designed by papers.media